
Inbox Management

Updated at January 16th, 2025
After familiarizing ourselves with the homepage, we will learn how to manage your inbox in your agent workspace.
At the beginning of each shift, we will perform the following actions:
1. Set your activity status for the duration of the shift (according to changes during the shift)
2. Organize your workspace in the inbox for incoming and outgoing conversations (using sorting and filters)
A few basic concepts before we start:
Module – A communication channel, such as WhatsApp, email, SMS, and more.
Channel – Represents a number, for example, under the WhatsApp module, several channels/numbers can be connected.
Sub-channel – Allows separation of different activities/departments under the same number, displayed only in the Cirrus Digital system and transparent to the end customer, so under one WhatsApp channel/number there can be several sub-channels.
Filters Menu
Using filters in the inbox allows agents to manage their workload efficiently and quickly, improve personal productivity, and maintain a high level of service.
The filters menu contains three filters: conversations, channels, and tags.
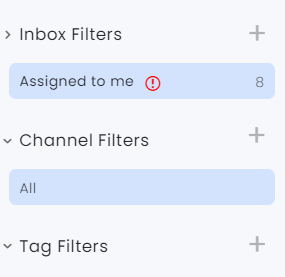
Under the conversations filter, you’ll find a list of “folders” containing conversations based on their status.
The folders are dynamic and are named according to the system administrator.
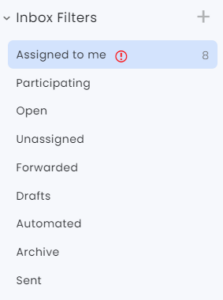
You can divide the filters into two main types:
Filtering by Conversation Status
Open
Displays all current open conversations in the inbox
Forwarded
Displays all conversations which have been transferred to another agent. This can happen in one of two ways:
- Manually transferred by the agent – Used for internal use only, to maintain an organized inbox for existing conversations.
- Transferred to an external entity – Transferring the conversation to an external entity that does not have access to Cirrus Digital’s platform, enabling them to review the conversation and provide input if necessary. Please note that the external entity will not be able to provide a first-hand answer directly to the customer but rather appear as a comment inside the reply section in the platform.
Drafts
Displays all conversations in which a first message has been opened yet no messages have been dispatched to a destination of any kind.
Automated
Displays all Conversations which are currently being handled by a bot.
Archive
Displays all conversations which have been marked as Resolved and have not changed status for an extended period of time (as set under the relevant channel settings).
Filtering by Conversation Assignment
Assigned to me
Displays all conversations assigned to the currently connected agent regardless of the conversation status.
Participating
Displays all conversations to which you are assigned as a participant – there is an option to add participants to an existing conversation, a participant can be an agent or another Cirrus Digital user and can also be an additional customer. There is no limit to the number of participants that can be added and each participant will be able to see the conversation content and respond to it.
Unassigned
Displays all active conversations that are currently not assigned to an agent or a bot, regardless of the conversation status.
Adding a New Filter
To add a new Inbox filter, click on the  symbol to the left of the header Inbox Filters.
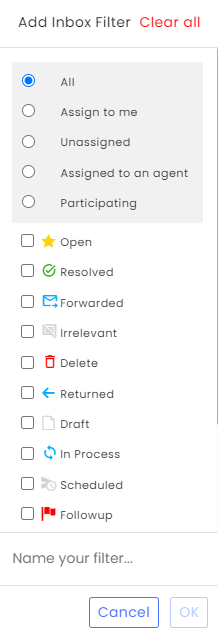
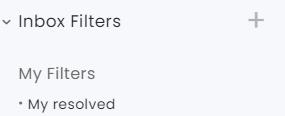
For example – we created a filter that will display only conversations assigned to me with the status “resolved”. After adding, the filter will appear under “My filters”:
Note, you can choose multiple statuses under the same filter. You can also create multiple filters as needed.
Additional Filters
The channels filter allows for separation between different channels in case there is permission for multiple channels. Clicking on the + to the left of “Channel filters” will allow you to choose the sub channels you want to include in the filter:

Note, if there’s a + sign to the right of a channel, you can continue to open submenus to select sub channels.
After selecting the channels we want to filter, we can name the filter and click Add.
The filter we created will be added as a permanent filter to the list of channel filters under “All”. The number of filtered channels will appear as a number on the left side.
You can always edit the filter by hovering over the filter name and clicking on the pencil icon or delete it by clicking on the X.
Note that the conversations and channels filters always work together – you need to select both filters, for example: choose “open” in the conversations filter and select the “WhatsApp” channel in the channels filter, and it will display all open conversations in the WhatsApp channel only.
The tags filter is designed to display conversations according to a defined tag (for example – topic, customer type, etc.). The filter allows selection of one or more tags where the conversations displayed can contain one of the selected tags or all of them together.
The tags filter is not mandatory and can be used as needed. Note that in this case as well, all three filters work together. For example, if we choose the same example – choosing an open conversations filter with WhatsApp channels filter and “VIP customer” tags filter, will show us all open conversations in the WhatsApp channel that have been tagged with the VIP customer tag.
Conversations List
You can get information about a conversation by hovering over a specific conversation in the conversation list:
Here are the different options in the conversation window:
Multiple selection – Checking the checkbox allows us to perform actions on multiple conversations simultaneously. After marking several conversations, a top menu will open that allows actions to be performed on the selected conversations:

Any choice of one of the actions will affect all marked conversations.
Conversation status – Indicating the status allows us to know if the conversation is new? Is the conversation being handled? Is the conversation being monitored?
Number of messages from agents – Indicating the number of messages allows us to know who sent the last message and who is waiting for whom (if the bubble is white – the customer is the last one who sent the message, if the bubble is gray – the agent sent the last message). Also, the number indicates complex/problematic conversations that may require a solution or intervention.
Conversation creation date – Indicates how long the conversation has been opened.
Snooze until (follow-up) – Setting a time to follow up on a message, according to the date and time we define. When this time arrives, the conversation will appear with a red flag indicator.
Conversation ID – ID of the conversation that can be sent, used to locate conversations and find information in reports.
Number next to the customer’s name – The number of times the customer has contacted us in the past. Clicking on the customer’s name will show their conversation history.
Conversation Window
Clicking on the conversation will open a window with the conversation thread.

The conversation window consists of four parts:
Conversation info – Channel, assignment, conversation status (in this example “open”) and tags
Conversation correspondence area
Reply field
Customer info card
