
Digital User Provisioning

Updated at January 16th, 2025
Table of Contents
Important Note
The following guide is for Cirrus' digital capabilities only. Please speak to your account manager or use the feedback links at the bottom of this page should you have any further questions.
Overview
Cirrus allows clients to create and manage users directly from their Identity Provider (IdP) of choice, such as Microsoft Entra ID (Azure). Any new users (agents or teams) added to the IdP will automatically be reflected in the Cirrus platform, reducing errors and ensuring centralized, secure management. This integration guide uses Entra ID (formally Azure) as an example. Contact us if you need help with a different IdP provider.
With this integration you’ll be able to:
- Create users in Cirrus
- Remove (deactivate) Cirrus users when they no longer require access
- Keep user attributes synchronised between Cirrus and Entra ID
- Set groups to Cirrus permission profiles
- Set Single-sign-on in Cirrus
Prerequisites
- This guide assumes that you already have the following prerequisites: A Microsoft Entra tenant
- One of the following roles: Application Administrator, Cloud Application Administrator, or Application Owner.
- A user account in Cirrus with Admin permissions.
Step-by-Step Guide
Step 1: Plan your provisioning deployment
- Learn about how the provisioning service works
- Determine who will be in scope for provisioning
- Determine what data to map between Microsoft Entra ID and Cirrus
Step 2: Obtain API Key for provisioning
1. At the Cirrus platform, navigate to Settings > API module, and click on the viewing icon at the API collum.
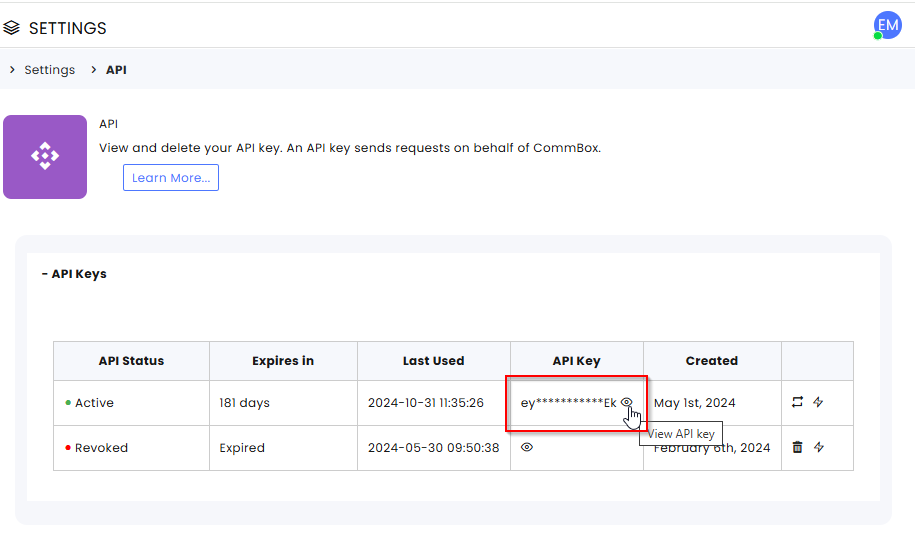
2. Copy the API key.

This API Key will be used as a Secret Token in the Admin Credentials Section of the Provisioning configuration in Azure.
Step 3: Create Azure AD Custom Application
On the sidebar menu click on Enterprise applications and next click on the + New application button.

In the Microsoft Entra Gallery select + Create your own application

In the name of your app field enter the application name, for example: yourbrandname.cirrusconnects.io and check the Integrate any other application you don't find in the gallery (Non-gallery) radio button option.

On the bottom of the page, click Create.
Step 4: (Optional) Add A New User in Azure AD
Sign in to Azure portal as a User administrator for the organization.
Search for and select Azure Active Directory from any page (also known as Microsoft Entra ID).

Create User - Select Users (Under Manage) on the sidebar menu, and then select Create new user.

On the Create new user page, enter the required information for this user.

Note: The User principal name in Azure Ad will be used for SAML authentication as oppose to the user.username used in Cirrus.
After entering the user information, click on Review + create.
On the next screen, review the created user information, add Basics, Properties, and Assignments as desired and required, and click Create.

Step 5 (Optional): Create A New Security Group in Azure AD
Create a security group in Azure Active Directory and add owners or members to the group.
Click Azure Active Directory

In the Manage section, click Groups.

Click the New group tab to create a new group in Azure Active Directory.
On the New Group page, enter the details for the new group.

Select a Group type (Security).
- In the Group name field, enter the group name. NOTE: The Group Name after Provisioning will become the Permission Profile name in Cirrus.
- In the Group description field, add a description to the group.
- Select the Membership type.You can optionally add members or users to the group.
- Click the link under Owners or Members to populate a list of every user or member in your directory.
- Choose users or members from the list, and then click Select.
Click Create.
Step 6: Assign Existing Users/Groups to The Application
Navigate to Home > Azure Active Directory> Enterprise applications.
Click on https://brandname.Cirrus.io (as an example)
Click the User and groups on the sidebar and then click + Add user/group.
If you don’t see any users, click on None Selected.
Select the user/s you wish to assign to the application and click Assign.
Step 7: Configure Automatic User and Groups Provisioning to Cirrus
This section guides you through the steps to configure the Microsoft Entra provisioning service to create, update, and disable users in Cirrus based on user assignments in Microsoft Entra ID.
Sign into the Microsoft Entra admin center as a Cloud Application Administrator or higher authority.
Navigate to Identity > Applications > Enterprise applications

In the applications list, select brandname.cirrusconnects.io. This was set earlier in the process, so be sure to select the name you entered.

On the side-bar menu, under Manage, select Provisioning.

Set the Provisioning Mode to Automatic.

At the Admin Credentials Section set:
- https://api.commbox.io/auth/scim in the Tenant URL.
- In the Secret Token field Insert the API Key obtained earlier (Step 2).
- Click on Test Connection

- Review the status message. If the Admin Credentials are working correctly the next message will appear:

Navigate to the Mappings section and set the Mappings as follows:

- Update the Users Attributes and click SAVE.
| customappsso Attribute | Microsoft Entra ID Attribute | Matching precedence |
| userName | userPrincipalName | * 1 |
| active | Switch([IsSoftDeleted], "False", "True", "True", "False") | |
| displayName | displayName | |
|
emails[type eq "work"].value
|
||
| name.givenName | givenName | |
| name.familyName | surname |
Update the Group Attributes and click SAVE.
customappsso Attribute |
Microsoft Entra ID Attribute |
Matching precedence |
displayName |
displayName |
* 1 |
members |
members |
|
* In the EDIT mode, 1 means that Match objects using this attribute = Yes
